iOS集成文档
适用范围
该文档适用于UPush 2.0.0及以上版本。
UMeng组件化SDK适用于iOS 9.0及以上操作系统。
重要更新
UPush.framework 从3.2.0及以上版本后,增加日志分级打印功能。详情请查看如何查看组件日志
2、PushSDK目前有撤销功能,里面用到静默推送的功能,PushSDK内部处理了撤销功能,并调用了completionHandler(UIBackgroundFetchResultNewData),如果客户需要用到撤销功能,在重载
-(void)application:(UIApplication*)application didReceiveRemoteNotification:(NSDictionary*)userInfo fetchCompletionHandler:(void(^)(UIBackgroundFetchResult))completionHandler时,不需要再调用completionHandler(UIBackgroundFetchResultNewData),否则会引起崩溃。
如果需要调用completionHandler(UIBackgroundFetchResultNewData),需要过滤PushSDK的撤销功能,代码如下:
-(void)application:(UIApplication*)application didReceiveRemoteNotification:(NSDictionary*)userInfo fetchCompletionHandler:(void(^)(UIBackgroundFetchResult))completionHandler
{
    //....TODO
    //过滤掉Push的撤销功能,因为PushSDK内部已经调用的completionHandler(UIBackgroundFetchResultNewData),
    //防止两次调用completionHandler引起崩溃
    if(![userInfo valueForKeyPath:@"aps.recall"])
     {
          completionHandler(UIBackgroundFetchResultNewData);
     }
}
升级旧版SDK到组件化SDK说明
如果您的APP已经接入过【友盟+】应用统计,Push,分享SDKs,升级过程中的接入方式和接口变动请参考老版SDK升级指南。
注 :升级SDK,不会影响【友盟+】应用统计的正常使用。
集成视频
开发者可关注友盟学院出品《iOS端集成视频》教程,手把手教您快速集成
Demo下载
快速集成
自动集成
cocoapod集成
    pod 'UMCommon'
    pod 'UMPush'
    pod 'UMDevice'
pod 'UYuMao'链接到Cocoapod的网页,如果需要更详细的cocoapod的集成组件,请点击这里
手动集成
组件化基础库UMCommon集成
组件化基础库UMCommon集成,请查看文档组件化Common集成文档
工程配置
选择SDK功能组件并下载,解压.zip文件得到相应组件包(例如:UMCommon.framework,UMPush.framework等)。
Xcode
File—>Add Files to "Your Project",在弹出Panel选中所下载组件包->Add。(注:选中“Copy items if needed”)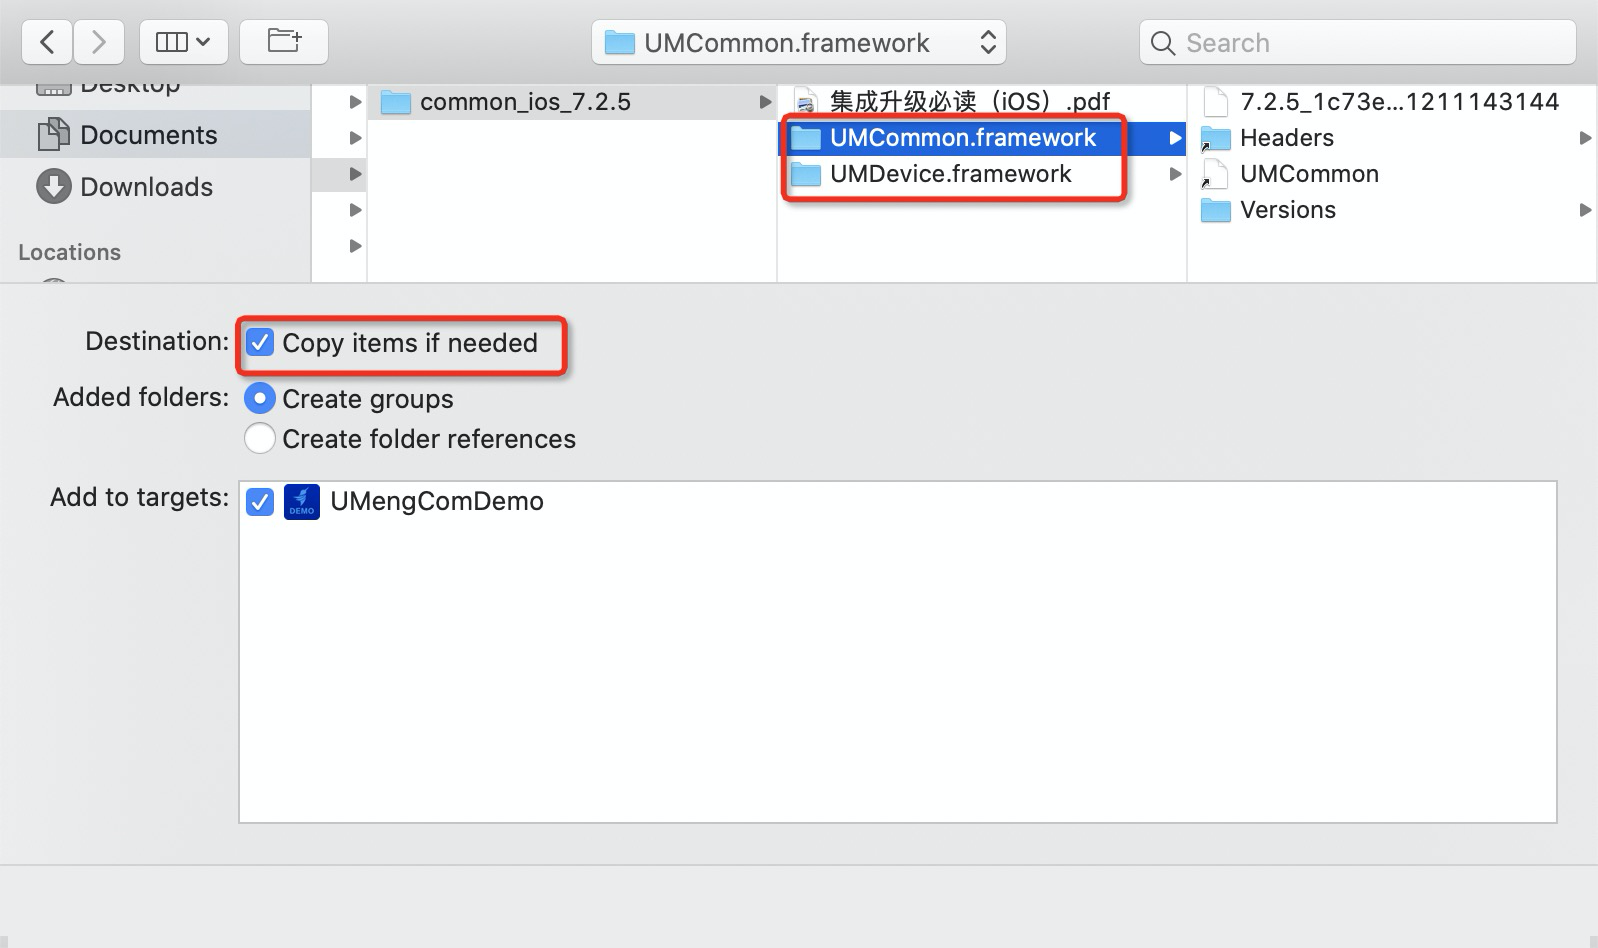
添加依赖库,在项目设置
target-> 选项卡General->Linked Frameworks and Libraries如下: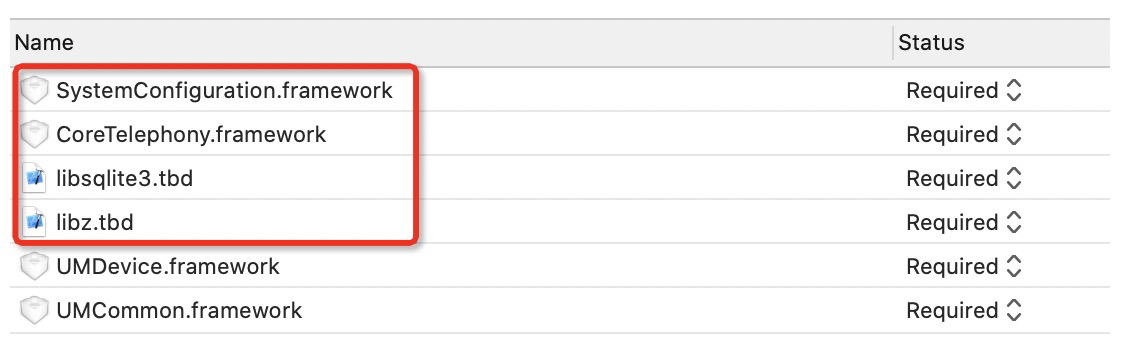
Targets->BuildSettings 中 , Other Linker Flags增加-ObjC,⼀定要添加此项,注意是⼤写C,不是⼩写c。
U-Push基础功能
项目配置
导入系统依赖库
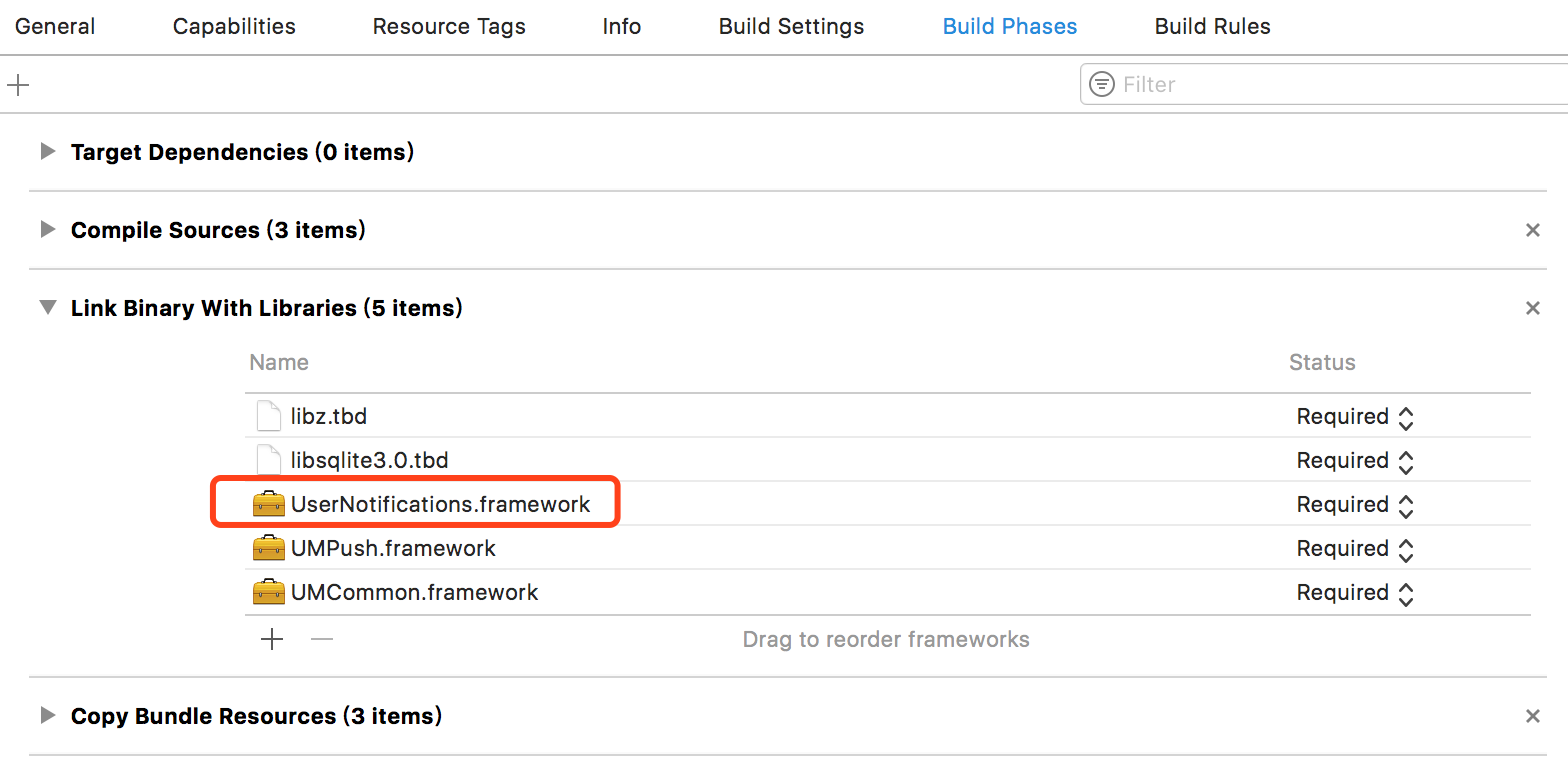
增加UserNotifications.framework到项目中。具体操作如下:点击项目——>TARGET——>Build Phases——>Link Binary with Libraries ——>左侧+号——>搜索UserNotifications——>选中UserNotifications.framework——>点击Add
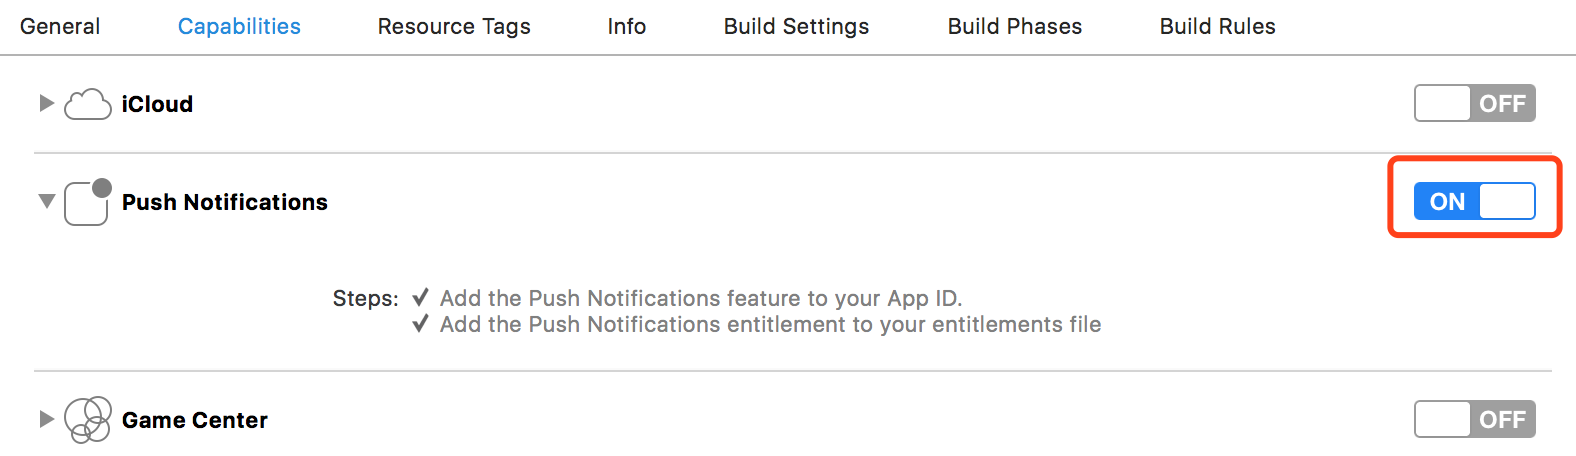
打开推送开关
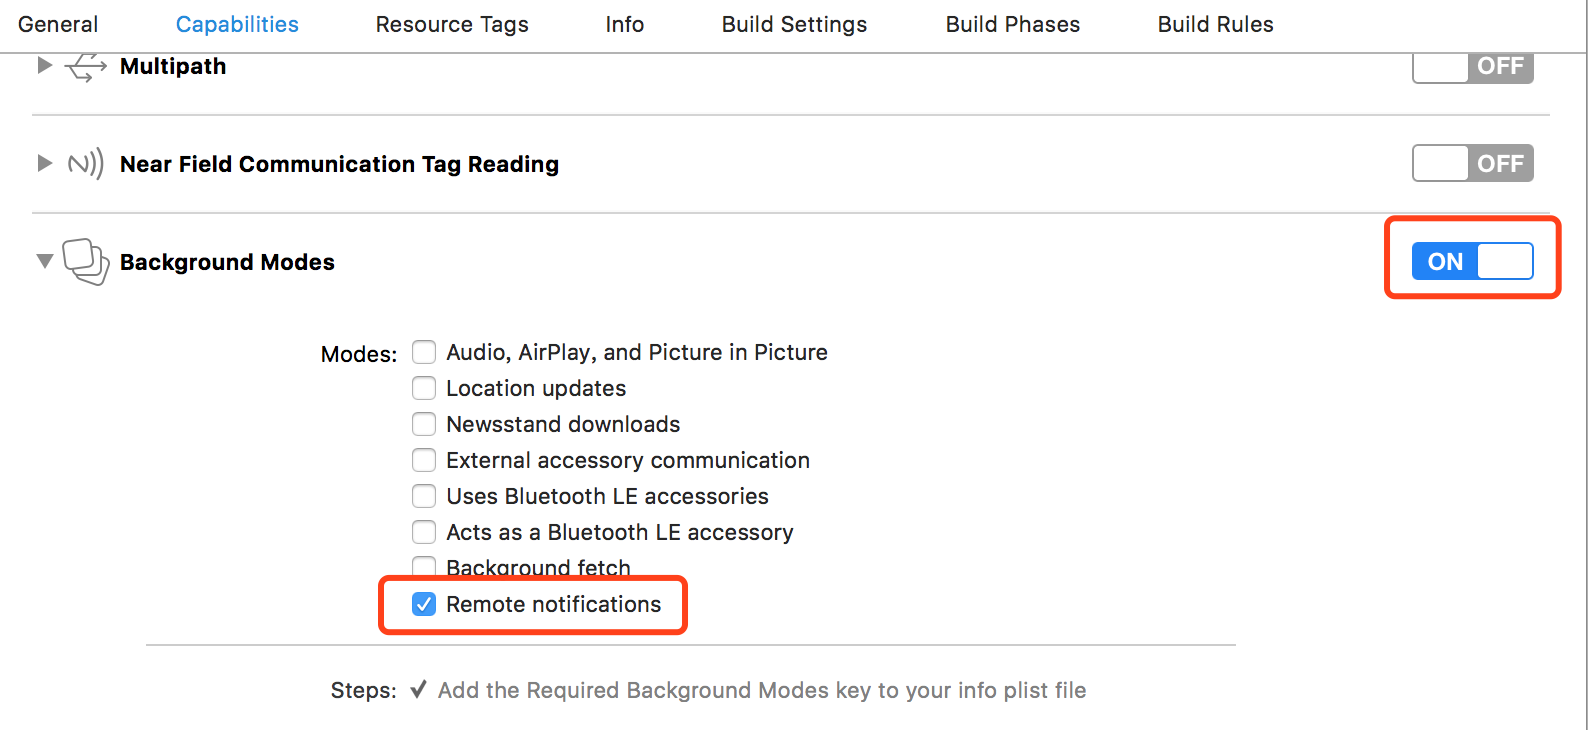
打开后台推送权限设置
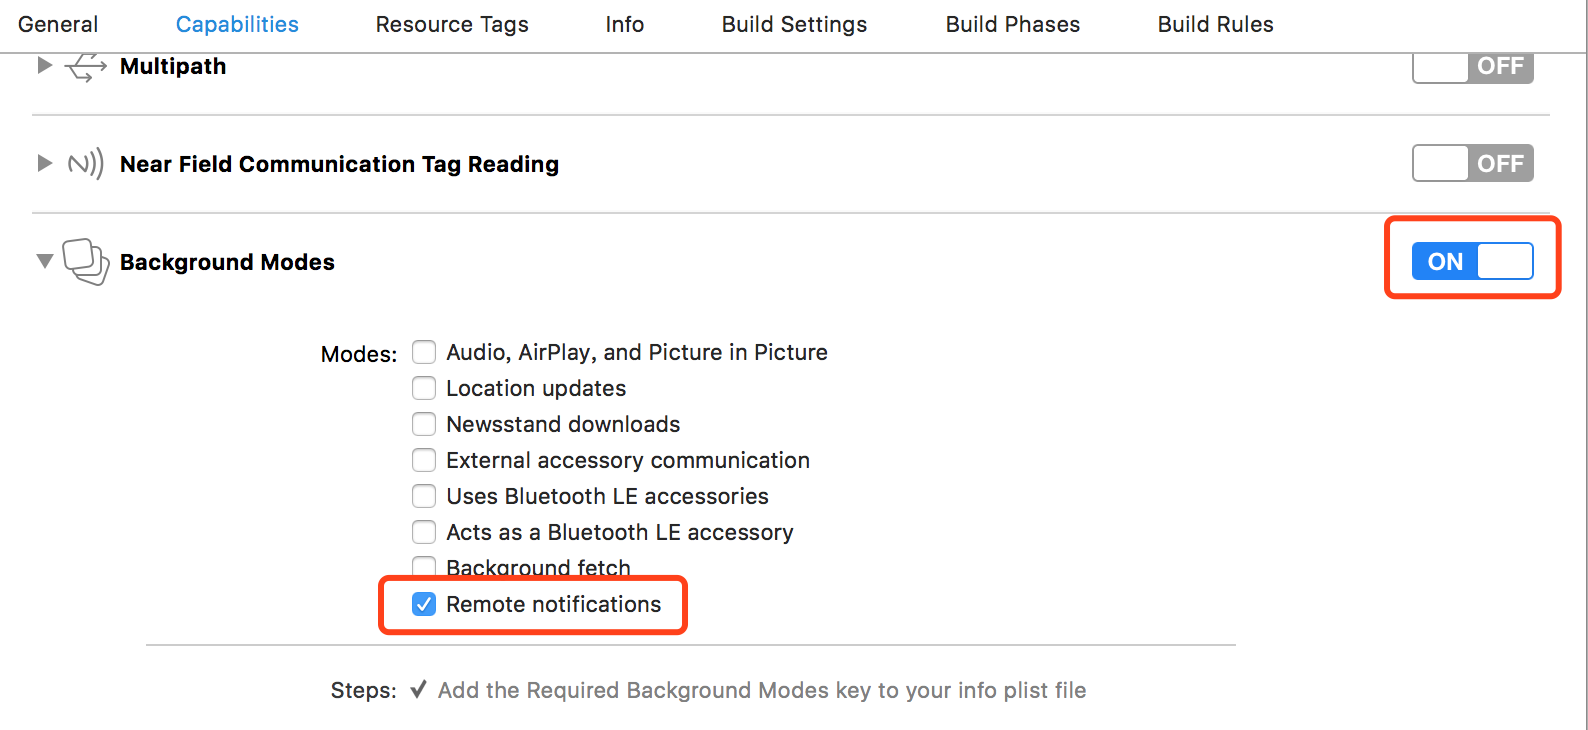
初始化
介绍及参数说明
自2.0.0以后版本,接口改为下面的形式,更方便集成。
参数 | 说明 |
launchOptions | 存储程序启动的原因 |
entity | Push注册配置类 |
completionHandler | iOS10以上的通知认证回调 |
接口函数
+(void)registerForRemoteNotificationsWithLaunchOptions:(NSDictionary*_Nullable)launchOptions Entity:(UMessageRegisterEntity*)entity completionHandler:(void(^_Nullable)(BOOL granted,NSError*__nullable error))completionHandler;普通推送详细集成
// Push组件基本功能配置
UMessageRegisterEntity* entity =[[UMessageRegisterEntity alloc] init];
//type是对推送的几个参数的选择,可以选择一个或者多个。默认是三个全部打开,即:声音,弹窗,角标
    entity.types =UMessageAuthorizationOptionBadge|UMessageAuthorizationOptionSound|UMessageAuthorizationOptionAlert;
[UNUserNotificationCenter currentNotificationCenter].delegate=self;
[UMessage registerForRemoteNotificationsWithLaunchOptions:launchOptions Entity:entity     completionHandler:^(BOOL granted,NSError*_Nullable error){
    if(granted){
    }else{
    }
}];
设置UNUserNotificationCenterDelegate回调函数
//iOS10新增:处理前台收到通知的代理方法
-(void)userNotificationCenter:(UNUserNotificationCenter*)center willPresentNotification:(UNNotification*)notification withCompletionHandler:(void(^)(UNNotificationPresentationOptions))completionHandler{
    NSDictionary* userInfo = notification.request.content.userInfo;
    if([notification.request.trigger isKindOfClass:[UNPushNotificationTriggerclass]]){
    [UMessage setAutoAlert:NO];
    //必须加这句代码
    [UMessage didReceiveRemoteNotification:userInfo];

    }else{
    //应用处于前台时的本地推送接受
    }
    completionHandler(UNNotificationPresentationOptionSound|UNNotificationPresentationOptionBadge|UNNotificationPresentationOptionAlert);
}

//iOS10新增:处理后台点击通知的代理方法
-(void)userNotificationCenter:(UNUserNotificationCenter*)center didReceiveNotificationResponse:(UNNotificationResponse*)response withCompletionHandler:(void(^)())completionHandler{
    NSDictionary* userInfo = response.notification.request.content.userInfo;
    if([response.notification.request.trigger isKindOfClass:[UNPushNotificationTriggerclass]]){
    //必须加这句代码
    [UMessage didReceiveRemoteNotification:userInfo];
    }else{
    //应用处于后台时的本地推送接受
    }
}
快捷交互详细集成
|
|
|
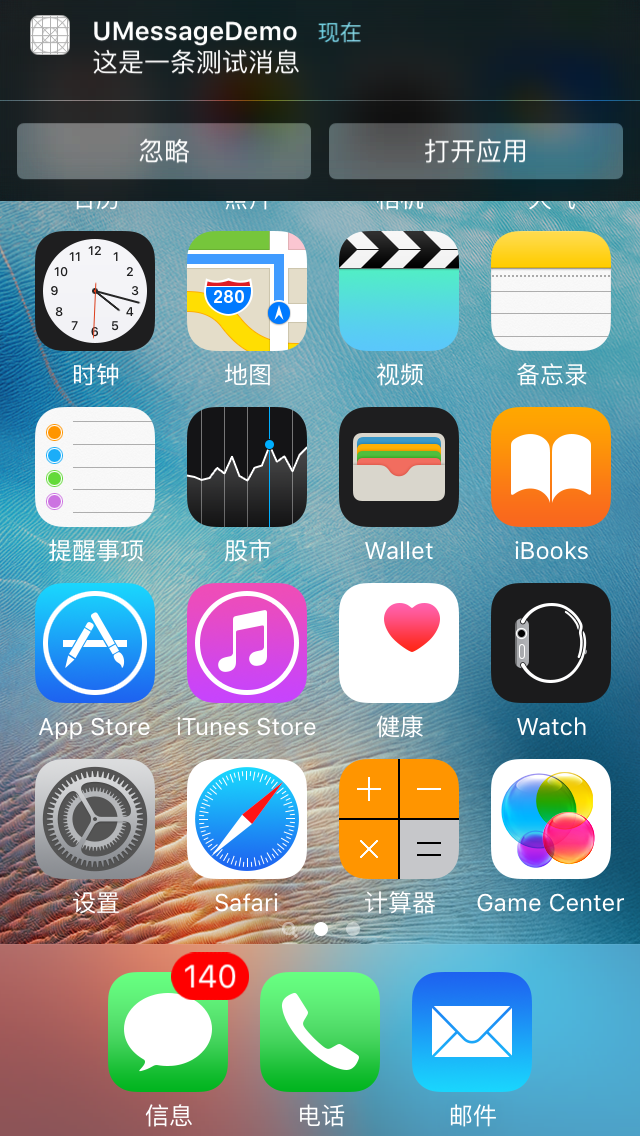
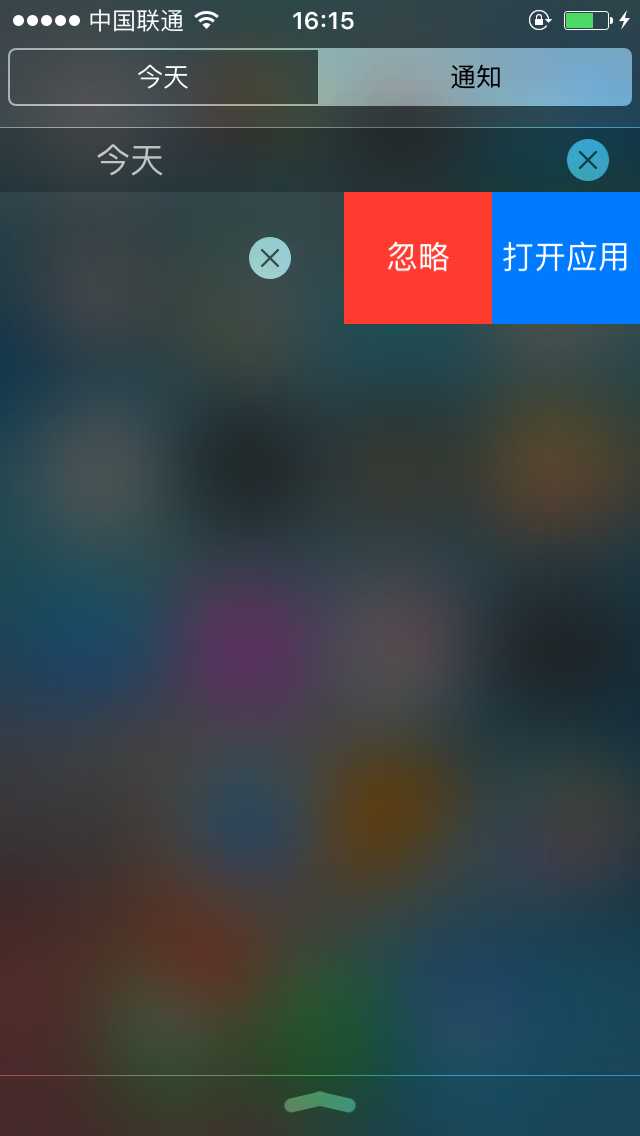
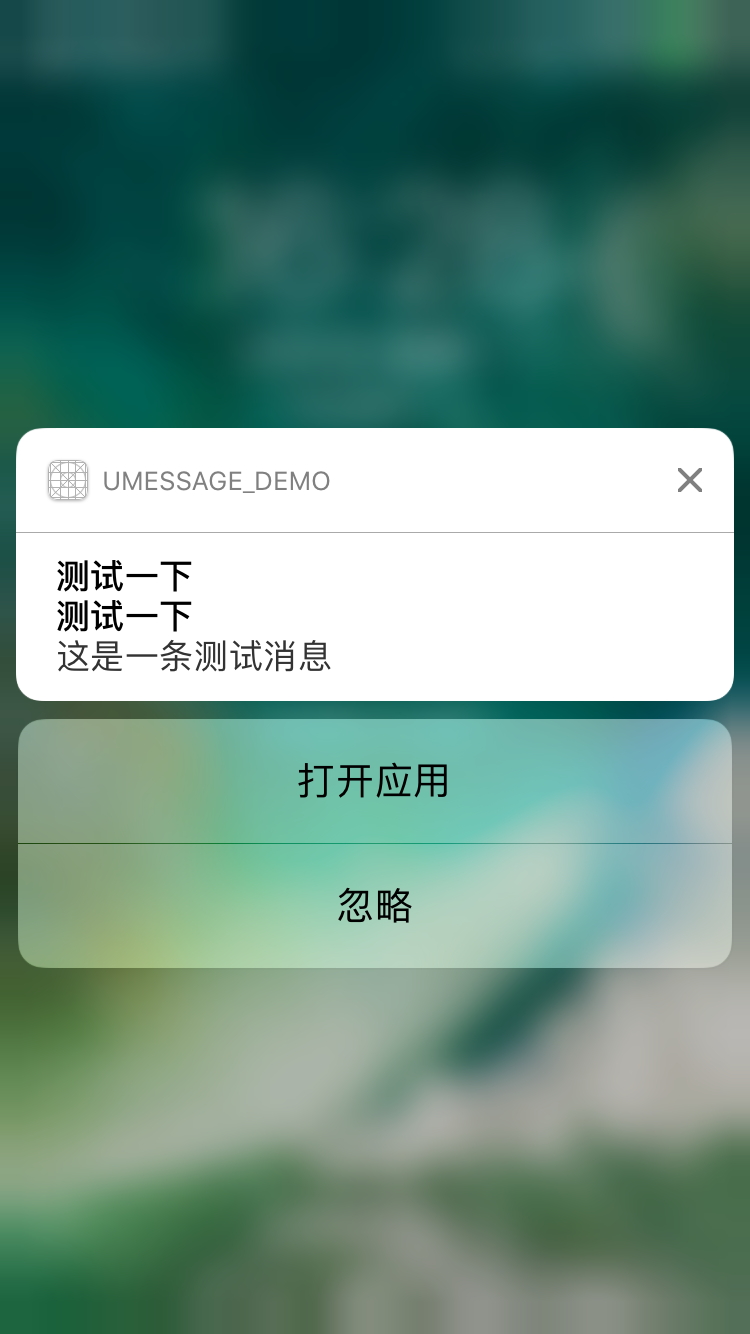
// Push功能配置
UMessageRegisterEntity* entity =[[UMessageRegisterEntity alloc] init];
 entity.types =UMessageAuthorizationOptionBadge|UMessageAuthorizationOptionAlert|UMessageAuthorizationOptionSound;
//如果你期望使用交互式(只有iOS 8.0及以上有)的通知,请参考下面注释部分的初始化代码
if(([[[UIDevice currentDevice] systemVersion]intValue]>=8)&&([[[UIDevice currentDevice] systemVersion]intValue]<10)){
    UIMutableUserNotificationAction*action1 =[[UIMutableUserNotificationAction alloc] init];
    action1.identifier =@"action1_identifier";
    action1.title=@"打开应用";
    action1.activationMode =UIUserNotificationActivationModeForeground;//当点击的时候启动程序

    UIMutableUserNotificationAction*action2 =[[UIMutableUserNotificationAction alloc] init];//第二按钮
    action2.identifier =@"action2_identifier";
    action2.title=@"忽略";
    action2.activationMode =UIUserNotificationActivationModeBackground;//当点击的时候不启动程序,在后台处理
    action2.authenticationRequired = YES;//需要解锁才能处理,如果action.activationMode = UIUserNotificationActivationModeForeground;则这个属性被忽略;
    action2.destructive = YES;
    UIMutableUserNotificationCategory*actionCategory1 =[[UIMutableUserNotificationCategory alloc] init];
            actionCategory1.identifier =@"category1";//这组动作的唯一标示
    [actionCategory1 setActions:@[action1,action2] forContext:(UIUserNotificationActionContextDefault)];
    NSSet*categories =[NSSet setWithObjects:actionCategory1,nil];
    entity.categories=categories;
}
//如果要在iOS10显示交互式的通知,必须注意实现以下代码
if([[[UIDevice currentDevice] systemVersion]intValue]>=10){
    UNNotificationAction*action1_ios10 =[UNNotificationAction actionWithIdentifier:@"action1_identifier" title:@"打开应用" options:UNNotificationActionOptionForeground];
    UNNotificationAction*action2_ios10 =[UNNotificationAction actionWithIdentifier:@"action2_identifier" title:@"忽略" options:UNNotificationActionOptionForeground];

    //UNNotificationCategoryOptionNone
    //UNNotificationCategoryOptionCustomDismissAction  清除通知被触发会走通知的代理方法
    //UNNotificationCategoryOptionAllowInCarPlay       适用于行车模式
    UNNotificationCategory*category1_ios10 =[UNNotificationCategory categoryWithIdentifier:@"category1" actions:@[action1_ios10,action2_ios10]   intentIdentifiers:@[] options:UNNotificationCategoryOptionCustomDismissAction];
    NSSet*categories =[NSSet setWithObjects:category1_ios10,nil];
     entity.categories=categories;
}

[UNUserNotificationCenter currentNotificationCenter].delegate=self;
[UMessage registerForRemoteNotificationsWithLaunchOptions:launchOptions Entity:entity completionHandler:^(BOOL granted,NSError*_Nullable error){
    if(granted){
    }else{
    }
}];
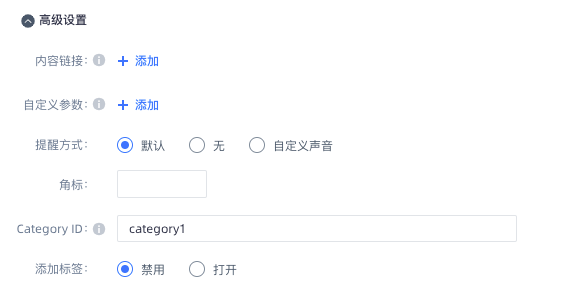
快捷交互后台发送
消息统计
介绍及参数说明
参数 | 说明 |
userInfo | 服务器下发下来的数据 |
接口函数
+(void)didReceiveRemoteNotification:(nullable NSDictionary*)userInfo;详细集成及示例代码
//iOS10以下使用这两个方法接收通知
-(void)application:(UIApplication*)application didReceiveRemoteNotification:(NSDictionary*)userInfo fetchCompletionHandler:(void(^)(UIBackgroundFetchResult))completionHandler
{
    [UMessage setAutoAlert:NO];
    if([[[UIDevice currentDevice] systemVersion]intValue]<10){
        [UMessage didReceiveRemoteNotification:userInfo];
    }

    //过滤掉Push的撤销功能,因为PushSDK内部已经调用的completionHandler(UIBackgroundFetchResultNewData),
     //防止两次调用completionHandler引起崩溃
    if(![userInfo valueForKeyPath:@"aps.recall"])
    {
        completionHandler(UIBackgroundFetchResultNewData);
    }
}

//iOS10新增:处理前台收到通知的代理方法
-(void)userNotificationCenter:(UNUserNotificationCenter*)center willPresentNotification:(UNNotification*)notification withCompletionHandler:(void(^)(UNNotificationPresentationOptions))completionHandler{
    NSDictionary* userInfo = notification.request.content.userInfo;
    if([notification.request.trigger isKindOfClass:[UNPushNotificationTriggerclass]]){
        [UMessage setAutoAlert:NO];
       //应用处于前台时的远程推送接受
      //必须加这句代码
       [UMessage didReceiveRemoteNotification:userInfo];
    }else{
    //应用处于前台时的本地推送接受
    }
    completionHandler(UNNotificationPresentationOptionSound|UNNotificationPresentationOptionBadge|UNNotificationPresentationOptionAlert);
}

//iOS10新增:处理后台点击通知的代理方法
-(void)userNotificationCenter:(UNUserNotificationCenter*)center didReceiveNotificationResponse:(UNNotificationResponse*)response withCompletionHandler:(void(^)())completionHandler{
    NSDictionary* userInfo = response.notification.request.content.userInfo;
    if([response.notification.request.trigger isKindOfClass:[UNPushNotificationTriggerclass]]){
   //应用处于后台时的远程推送接受
    //必须加这句代码
    [UMessage didReceiveRemoteNotification:userInfo];
    }else{
    //应用处于后台时的本地推送接受
    }
iOS送达统计
iOS送达属于高级功能,除客户端需集成插件外,还需联系友盟开启iOS送达功能。
如想统计iOS送达指标,请下载此压缩包
https://counsel.umeng.com/api/activity/download?fileName=activity/67/iOS arrive.zip
开发者可使用 Notification Service Extension SDK 上报每条 APNs 信息的送达状态。
使用方法:
1、 将 压缩包里libUMessageNotificationExtensionService.a 和 UMessageNotificationExtensionService.h 两个文件引 入到您的 Service Extentsion 工程中。
2、 调用 [UMessageNotificationExtensionService receiveNotificationRequest:request appkey:@"xxxx" withContentHandler:contentHandler] 方法上报您的 apns 消息,完成送达统计;在该方法的 block 回调中进 行 apns 的显示。
appkey必须要和主程序初始化一样,保证是同一个App
 #import "NotificationService.h"
#import "UMessageNotificationExtensionService.h"
@interface NotificationService ()
@property (nonatomic, strong) void (^contentHandler)(UNNotificationContent *conten tToDeliver);
@property (nonatomic, strong) UNMutableNotificationContent *bestAttemptContent;
@end
@implementation NotificationService
- (void)didReceiveNotificationRequest:(UNNotificationRequest *)request withContent Handler:(void (^)(UNNotificationContent * _Nonnull))contentHandler {
self.contentHandler = contentHandler; self.bestAttemptContent = [request.content mutableCopy];
[UMessageNotificationExtensionService receiveNotificationRequest:request appkey:@"60 self.contentHandler(self.bestAttemptContent);
}]; }
- (void)serviceExtensionTimeWillExpire {
// Called just before the extension will be terminated by the system.
// Use this as an opportunity to deliver your "best attempt" at modified content, oth self.contentHandler(self.bestAttemptContent);
} @end
设置是否允许SDK自动清空角标
介绍及参数说明
参数 | 说明 | 其他 |
value | 是否清除角标 | 默认自动角标清零 |
接口函数
+(void)setBadgeClear:(BOOL)value;详细集成及示例代码
[UMessage setBadgeClear:NO];设置是否允许SDK当应用在前台运行收到Push时弹出Alert框
介绍及参数说明
参数 | 说明 | 其他 |
value | 是否打开前台弹窗 | 默认打开 |
接口函数
+(void)setAutoAlert:(BOOL)value;详细集成及示例代码
[UMessage setAutoAlert:NO];U-Push高级功能
使用标签
介绍及参数说明
参数 | 说明 |
tag | 给设备打的标签 1、长度限制为128个字符 2、单个用户的tag限制1024个 3、tag使用半角字符,大小写敏感 4、tag中不要出现逗号(,)和双竖线(||) |
接口函数
//获取所有标签
+(void)getTags:(void(^_Nonnull)(NSSet*__nonnull responseTags,NSInteger remain,NSError*__nonnull error))handle;
//添加标签
+(void)addTags:(__nonnull id)tag response:(nullable void(^)(id __nonnull responseObject ,NSInteger remain,NSError*__nonnull error))handle;
//删除标签
+(void)deleteTags:(__nonnull id)tag response:(nullable void(^)(id __nonnull responseObject,NSInteger remain,NSError*__nonnull error))handle;
详细集成及示例代码
//获取所有标签
[UMessage getTags:^(NSSet*_Nonnull responseTags,NSInteger remain,NSError*_Nonnull error){
}];

//添加标签
[UMessage addTags:@"体育" response:^(id  _Nonnull responseObject,NSInteger remain,NSError*_Nonnull error){
}
}];

//删除标签
[UMessage deleteTags:@"体育" response:^(id  _Nonnull responseObject,NSInteger remain,NSError*_Nonnull error){
}
}];
使用别名
介绍及参数说明
参数 | 说明 |
name | 别名的具体信息 1、长度限制为128个字符 2、格式仅支持半角大小写字母,数字,下划线 3、单个name下同时生效的device_token数最多10个,pro可调整,绑定多个(>1k)设备的场景用tag更合适 |
type | 别名的type 1、type长度限制为64个字符 2、type的格式仅支持半角大小写字母,数字,下划线 3、单个appkey下同时生效的alias_type数最多10个 |
handle | 接口回调 |
接口函数
//绑定别名
+(void)addAlias:(NSString* __nonnull)name type:(NSString* __nonnull)type response:(nullable void(^)(id __nonnull responseObject,NSError*__nonnull error))handle;
//重置别名
+(void)setAlias:(NSString*__nonnull )name type:(NSString* __nonnull)type response:(nullable void(^)(id __nonnull responseObject,NSError*__nonnull error))handle;
//移除别名
+(void)removeAlias:(NSString* __nonnull)name type:(NSString* __nonnull)type response:(nullable void(^)(id __nonnull responseObject,NSError*__nonnull error))handle;
详细集成及示例代码
//绑定别名
[UMessage addAlias:@"test@umeng.com" type:@"UMENGTEST" response:^(id  _Nonnull responseObject,NSError*_Nonnull error){
}];
//重置别名
[UMessage setAlias:@"test@umeng.com" type:@"UMENGTEST" response:^(id  _Nonnull responseObject,NSError*_Nonnull error){
}];
//移除别名
[UMessage removeAlias:@"test@umeng.com" type:@"UMENGTEST" response:^(id  _Nonnull responseObject,NSError*_Nonnull error){
}];
设置角标
介绍及参数说明
参数 | 说明 |
badge | 设置角标数量,同步服务器角标计数 1、int类型 2、>=0 && <=99 |
该接口仅用于同步角标数字到服务器
若App需要显示角标,需自行调用
[[UIApplication sharedApplication] setApplicationIconBadgeNumber:badge]进行设置。
接口函数
/* 设置角标数量*/
+ (void)setBadge:(int)badge response:(void (^__nonnull)(id __nullable responseObject, NSError * __nullable error))handle;
详细集成及示例代码
[UMessage setBadge:badge response:^(id  _Nullable responseObject, NSError * _Nullable error) {
	if(responseObject)
  {
  	[self showMessageAlert:@"setBadge 设置成功!"];
  }
  else
  {
  	[self showMessageAlert:error.localizedDescription];
  }
}];
静默推送
手机端配置
当app没有启动的时候或者被杀掉的时候将无法收到静默推送。 静默推送必须实现 application:didReceiveRemoteNotification:fetchCompletionHandler:
静默推送除badge及自定义字段外,不应该包含其他字段(如果要badge,建议通过本地通知实现)。
如果只实现了application:didReceiveRemoteNotification:方法,没有实现application:didReceiveRemoteNotification:fetchCompletionHandler:将无法在后台是收到静默推送。
后端发送
下面以Python为例:
#coding=utf-8
import time
import hashlib
import requests
import json
import urllib2
import random
def md5(s):
    m = hashlib.md5(s)
    return m.hexdigest()

def push_unicast(appkey, app_master_secret, device_token):
    timestamp = int(time.time()*1000)
    method ="POST"
    url ="http://msg.umeng.com/api/send"
    params ={
                "appkey": appkey,
                "timestamp": timestamp,
                "device_tokens": device_token,
                "type":"listcast",
# ========================消息体===========================
                "payload":{
                    "aps":{
                        "alert":str(random.random()),
                        #"badge":100,
                        "content-available":1
                        #"recall": "uu07360151565675199411"
                    }
                }
# ========================消息体===========================
                "production_mode":"false"
            }
    post_body = json.dumps(params)
    print post_body
    sign = md5("%s%s%s%s"%(method,url,post_body,app_master_secret))
    try:
        r = urllib2.urlopen(url +"?sign="+sign, data=post_body)
        print r.read()
    except urllib2.HTTPError,e:
        print e.reason,e.read()
    except urllib2.URLError,e:
        print e.reason

if __name__ =="__main__":
    appkey ="appkey"
    app_master_secret ="app secret"
    device_token ="devicetoken"
    push_unicast(appkey, app_master_secret, device_token)
应用内消息
接口函数
//添加开屏消息
+(void)addLaunchMessage;
//添加插屏消息
+(void)addCardMessageWithLabel:(NSString* __nonnull)label;
//添加自定义插屏消息
+(void)addCustomCardMessageWithPortraitSize:(CGSize)portraitsize LandscapeSize:(CGSize)landscapesize CloseBtn:(UIButton*_Nullable)button  Label:(NSString*_Nonnull)label umCustomCloseButtonDisplayMode:(BOOL )displaymode;
//添加文本插屏消息
+(void)addPlainTextCardMessageWithTitleFont:(UIFont*_Nullable)titlefont ContentFont:(UIFont*_Nullable)contentfont buttonFont:(UIFont*_Nullable)buttonfont Label:(NSString*_Nonnull)label;
//设置插屏消息的模式
+(void)openDebugMode:(BOOL)debugmode;
//设置插屏消息点击跳转的url
+(void)setWebViewController:(UIViewController*_Nonnull)webViewController;
基础设置
打开应用内消息Debug模式
在addLaunchMessageWithFinishHandler之前调用openDebugMode,不写默认为生产模式,必须在addLaunchMessag前调用。
自定义跳转WebView
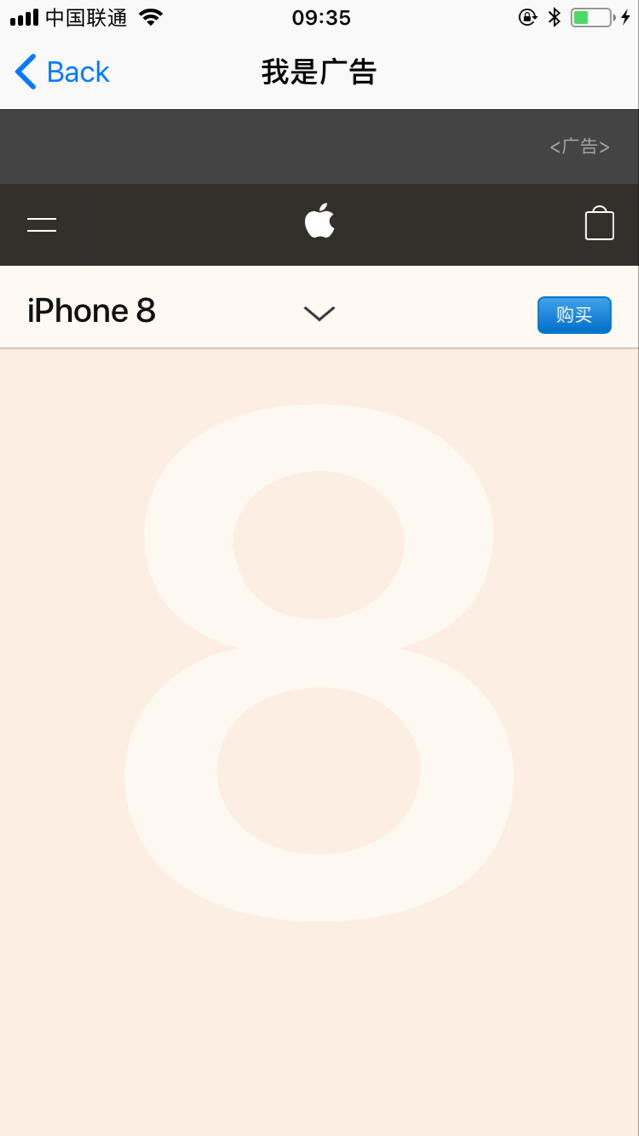
SDK默认后续动作为url的时候,会在系统浏览器中去打开这个url。iOS增加了在APP中打开URL的功能,首先用户去实现一个webview的Controller类,在.h文件中声明一个名为url的string,然后在.m文件中打开这个url就可以了。 然后在初始化之后调用。效果如下:
UMWebViewController.h

@interfaceUMWebViewController:UIViewController
@property(nonatomic, copy)NSString*url;
@end
在调用应用内消息之前配置WebView
[UMessage setWebViewController:[[UMWebViewController alloc] init]];UMWebViewController是自定义的一个示例WebViewController。
开屏消息详细集成
基本介绍
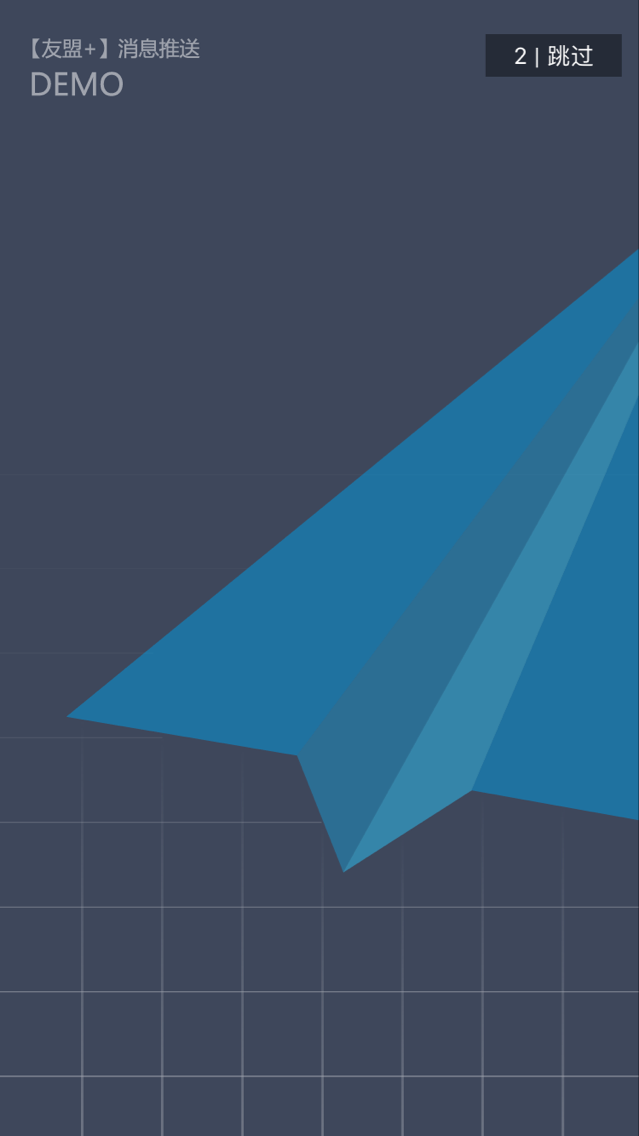
开屏消息就是当app启动,或者从其他页面跳转到app时,调用的一个启动页面,效果如下图所示
基本配置
为了保证项目开屏的美观,请务必添加完整的LaunchImage启动图,或者一个添加一张750 * 1334的名为Launchplaceholder的图片(否则会显示一个黑屏状态或其他异常情况)。
如果要适配iOS7,请务必添加完整的LaunchImage启动图,或者在LaunchImage添加一张640*1136的图片。
注意:不支持横屏
Status Bar设置
如果需要屏蔽Status Bar,在Info.plist中增加一个View controller-based status bar appearance参数,并且设置为NO。
插屏消息详细集成
基本介绍
插屏消息就是APP在打开以后弹出的一个插屏页面,或者用户去点击某些活动页面弹出的插屏消息。如下图所示:
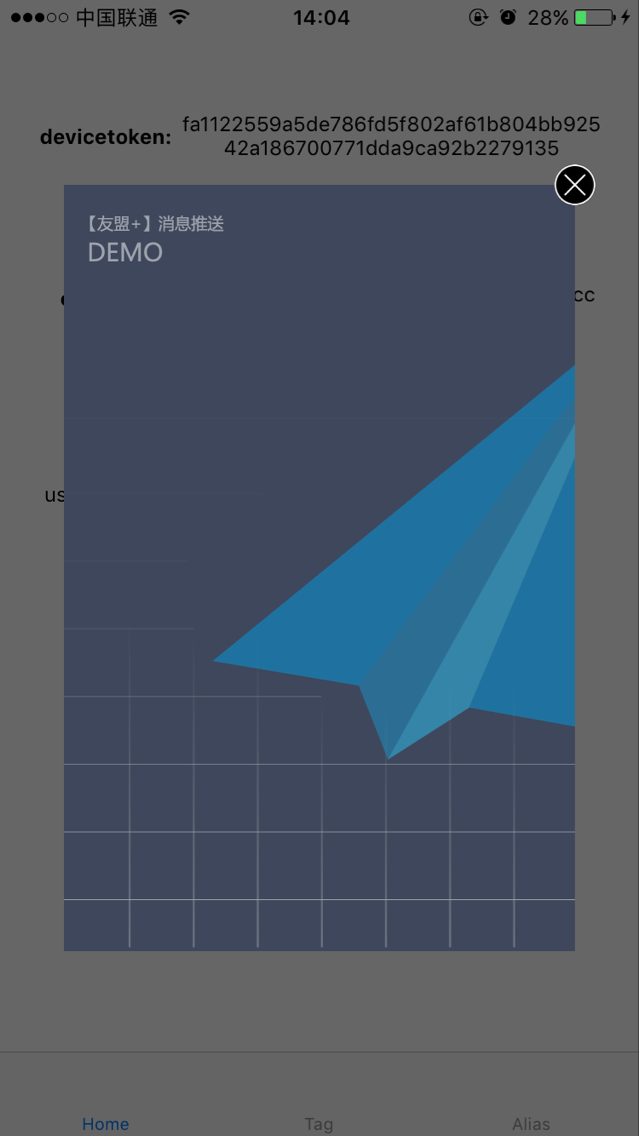
增加插屏消息
参数 | 说明 |
label | 标识名称,用来在后端配置具体消息及数据统计 |
[UMessage addCardMessageWithLabel:@"这里写标识"];addCardMessageWithLabel后写插屏通知位置的标识字符串,比如说可以写:home,setting等等
注意:建议不要同时多点触发。
自定义插屏消息详细集成
基础介绍
插屏消息就是APP在打开以后弹出的一个插屏页面,或者用户去点击某些活动页面弹出的插屏消息。可以实现用户自定义大小,以及按钮的自定义等,具体效果如下:
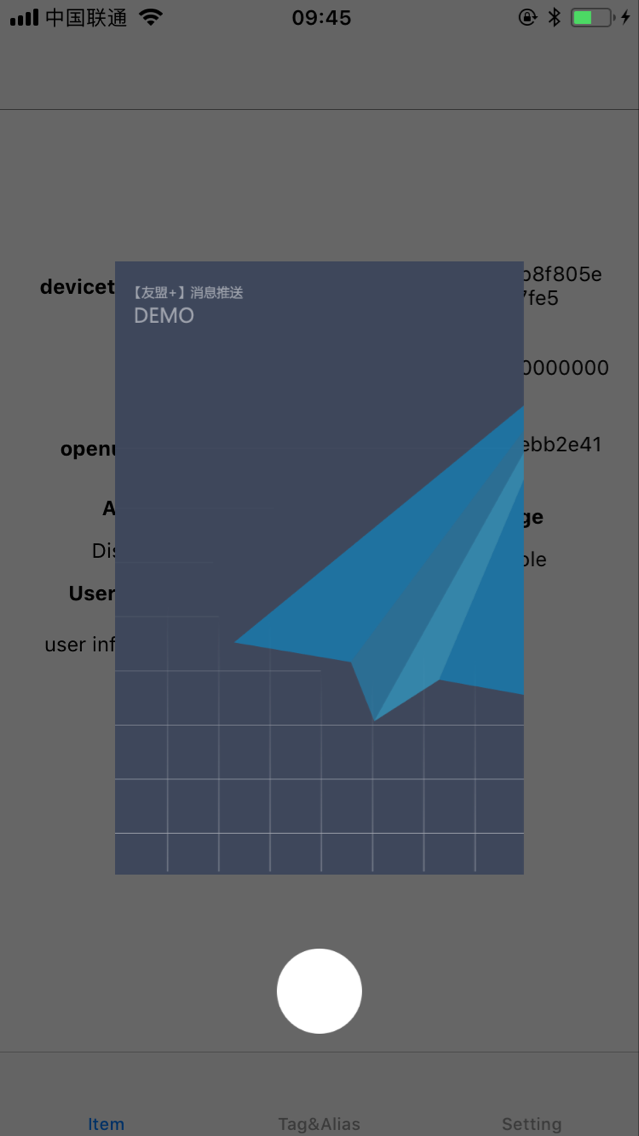
可以自定义竖屏、横屏是Card的尺寸何有下方按钮的显示,以及按钮的自定义。
增加自定义插屏消息
参数 | 说明 |
titlefont | 文本插屏标题的UIFont |
contentfont | 文本插屏内容的UIFont |
buttonfont | 文本插屏按钮的UIFont |
label | 标识名称,用来在后端配置具体消息及数据统计 |
[UMessage addCustomCardMessageWithPortraitSize:CGSizeMake(200,200)LandscapeSize:CGSizeMake(300,300)CloseBtn:nilLabel:@"home2" umCustomCloseButtonDisplayMode:NO];文本插屏消息详细集成
基础介绍
文本插屏通知可以给用户提示一些文本信息等。可以自定义文字大小。
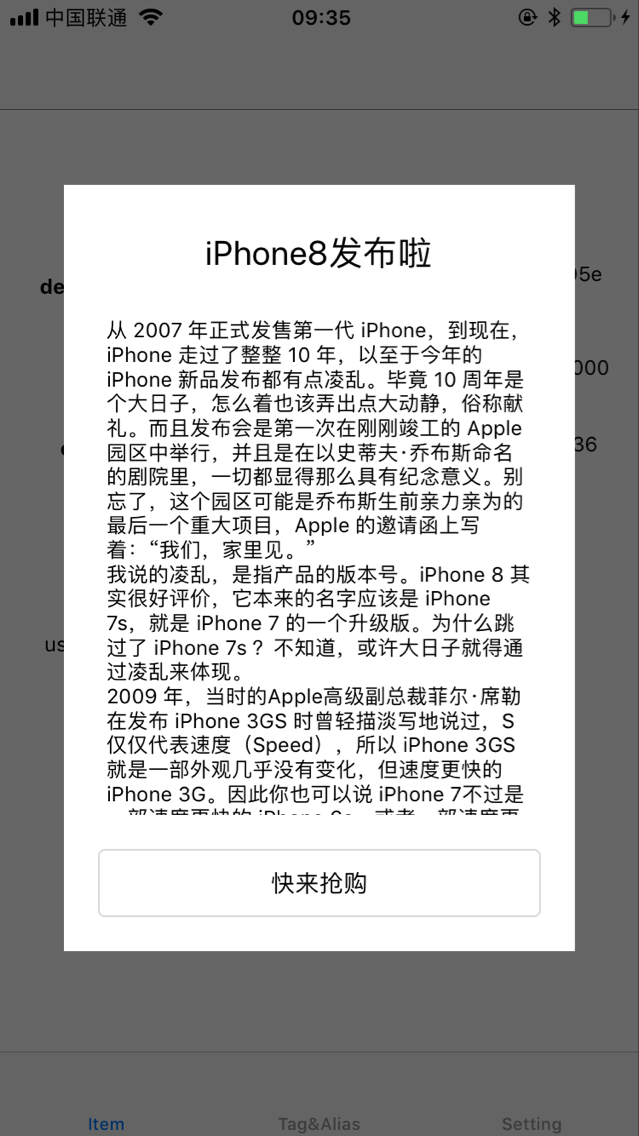
增加文本插屏消息
参数 | 说明 |
portraitsize | portrait时的插屏size |
landscapesize | landscape时的插屏size |
button | 下方的自定义button,不需要可以写nil |
label | 标识名称,用来在后端配置具体消息及数据统计 |
displaymode | 插屏右上角的关闭button是否显示 |
[UMessage addPlainTextCardMessageWithTitleFont:[UIFont systemFontSize]ContentFont:[UIFont systemFontSize] buttonFont:[UIFont systemFontSize]Label:@"test"];后台创建应用内消息
【设置消息的描述】【设置消息的样式】【设置消息图片】【设置消息的按钮详情】
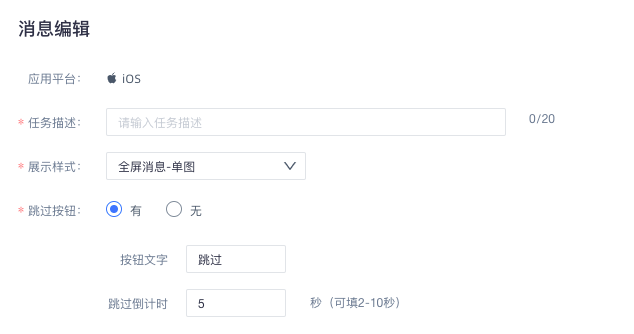
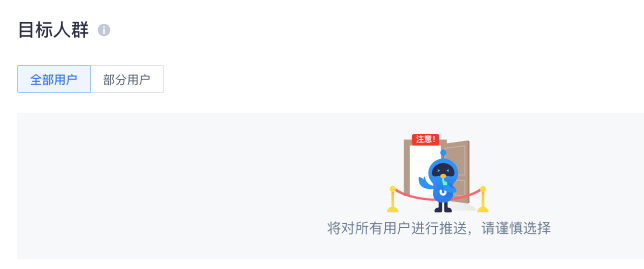
【设置消息的目标人群】
iOS10富文本推送
首先我们创建一个Notification Service Extension,具体步骤如下:File——>New——>Target——->Notification Service Extension——->命名创建的Notification Service Extension中有三个文件,如下图所示:

将下面的代码复制到NotificationService.m文件中,也可以自行编写相关代码。
-(void)didReceiveNotificationRequest:(UNNotificationRequest*)request
                   withContentHandler:(void(^)(UNNotificationContent*_Nonnull))contentHandler {
    self.contentHandler = contentHandler;
    self.bestAttemptContent =[request.content mutableCopy];
    //[modified]这个是一个标示,可以实现对服务器下发下来的内容进行更改
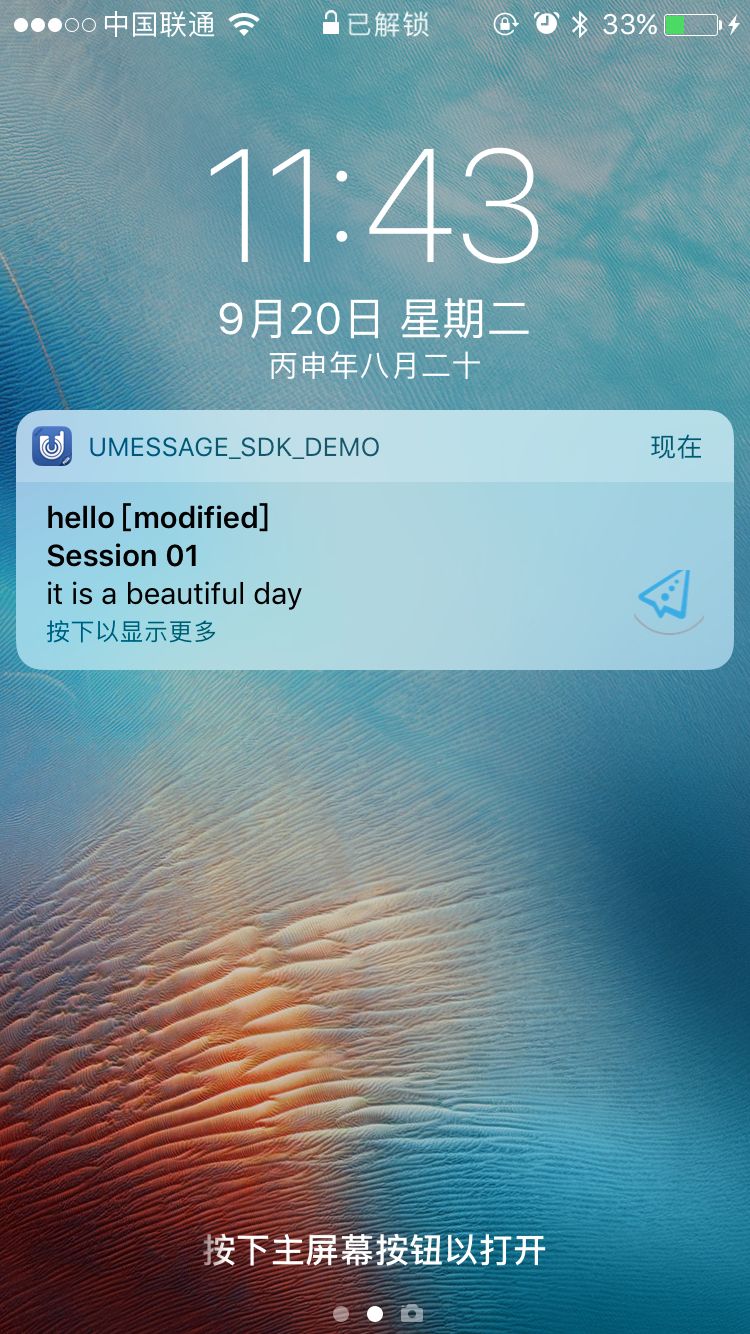
    self.bestAttemptContent.title =[NSString stringWithFormat:@"%@ [modified]",self.bestAttemptContent.title];

    NSDictionary*apsDic =[request.content.userInfo objectForKey:@"aps"];
    NSString*attachUrl =[apsDic objectForKey:@"image"];

    NSString*category =[apsDic objectForKey:@"category"];
    self.bestAttemptContent.categoryIdentifier = category;

    NSURLSession*session =[NSURLSession sharedSession];
    NSURL *url =[NSURL URLWithString:attachUrl];
    NSURLSessionDownloadTask*downloadTask =[session downloadTaskWithURL:url
                                                        completionHandler:^(NSURL *_Nullable location,
    NSURLResponse*_Nullable response,
    NSError*_Nullable error){
    NSString*caches =[NSSearchPathForDirectoriesInDomains(NSCachesDirectory,NSUserDomainMask, YES) lastObject];
    NSString*file =[caches stringByAppendingPathComponent:response.suggestedFilename];
    NSFileManager*mgr =[NSFileManager defaultManager];
    [mgr moveItemAtPath:location.path toPath:file error:nil];

    if(file &&![file  isEqualToString:@""])
    {
      UNNotificationAttachment*attch=[UNNotificationAttachment attachmentWithIdentifier:@"photo"
                                                                                                                                                URL:[NSURL URLWithString:[@"file://" stringByAppendingString:file]]
                                                                                                                                            options:nil
                                                                                                                                              error:nil];
       if(attch)
       {
          self.bestAttemptContent.attachments =@[attch];
       }
    }
    self.contentHandler(self.bestAttemptContent);
   }];
  [downloadTask resume];

}
注意: self.bestAttemptContent.title = [NSString stringWithFormat:@”%@ [modified]”, self.bestAttemptContent.title];可以用来测试项目是否调用了notification service
后台发送
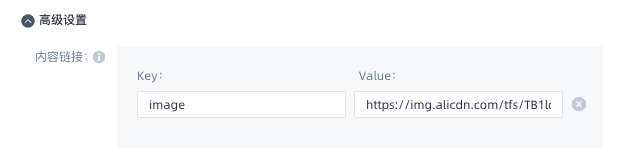
API发送
发送一个消息,消息体如下所示。
{
    "appkey":"your appkey",
    "production_mode":"false",
    "timestamp":1474340669558,
    "device_tokens":"your devicetoken",
    "type":"unicast",
    "payload":{
        "aps":{
        "mutable-content":1,
        "badge":1,
        "alert":{
            "body":"hello this is body",
            "subtitle":"hello title",
            "title":"hello this is subtitle"
        },
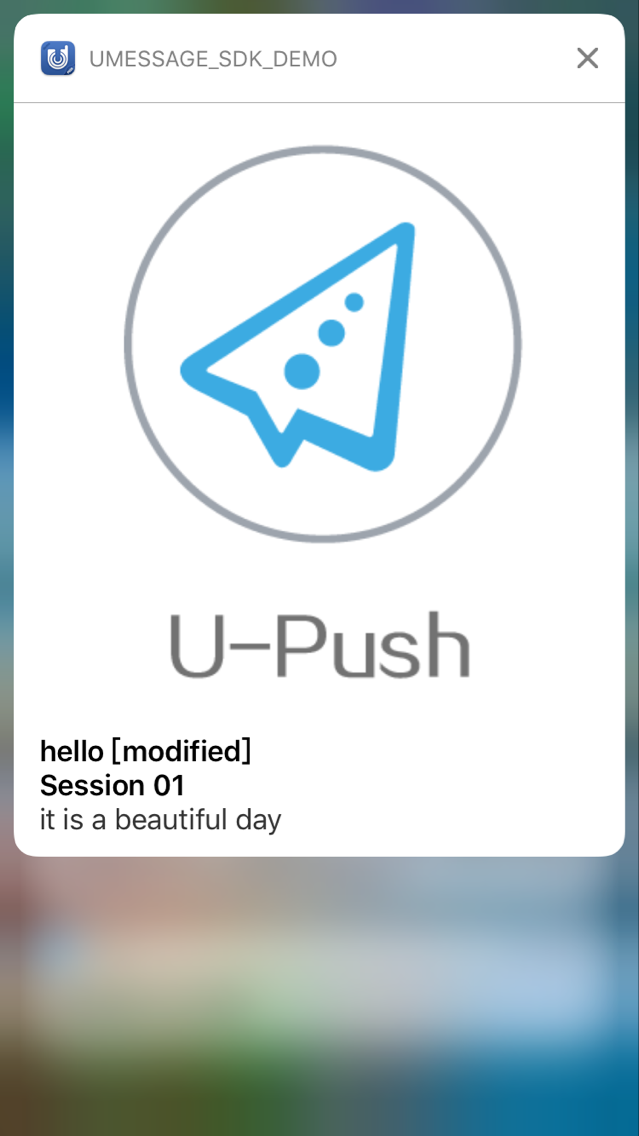
        "image":"https://dev.umeng.com/system/resources/W1siZiIsIjIwMTYvMDkvMjAvMTFfMzhfMzhfMTFfcHVzaC5wbmciXV0/push.png"
        }
    }
}
注意:富文本的内容链接必须是https的
效果图
iOS送达统计
iOS送达指标统计是U-Push高级功能,如果您有此需求请先按照上文基础功能模块里的iOS送达统计中添加指定库到App里,再联系友盟+商务,我们会为您开通此功能
推送地理围栏设置
如需使用地理围栏功能,需要集成对应SDK(UYuMao.framework),并声明以下权限(可选):
建议在info.plist配置以下3个权限的key:

NSLocationAlwaysAndWhenInUseUsageDescription
NSLocationAlwaysUsageDescription
NSLocationWhenInUseUsageDescription
如不需使用地理围栏功能,可调用以下关闭接口:
#import <UYuMao/UYuMao.h>

[UYuMaoManager ym1Off]; // 禁止获取位置信息(发起定位请求)
[UYuMaoManager ym2Off]; // 禁止获取位置信息(读取定位缓存)
[UYuMaoManager ym3Off]; // 禁止获取已连接WiFi路由器信息关闭接口需要在[UMConfigure initWithAppkey:@"" channel:@""]函数调用之前调用。
功能调试
调试步骤
确认证书设置正确。参见 iOS 证书设置指南
确认Provisioning Profile配置正确,并已更新
在友盟消息推送后台上传正确的 Push 证书
启动应用程序,并在选择接受推送通知
确认 App 是开启 Push 权限的
在网站后台选择对应的Device Token进行推送测试
获取设备的 DeviceToken
开发环境下:
在 didRegisterForRemoteNotificationsWithDeviceToken 中添加如下语句
#include<arpa/inet.h>
-(void)application:(UIApplication*)application
didRegisterForRemoteNotificationsWithDeviceToken:(NSData*)deviceToken
{
     if(![deviceToken isKindOfClass:[NSDataclass]])return;
    constunsigned*tokenBytes =(constunsigned*)[deviceToken bytes];
    NSString*hexToken =[NSString stringWithFormat:@"%08x%08x%08x%08x%08x%08x%08x%08x",
                          ntohl(tokenBytes[0]), ntohl(tokenBytes[1]), ntohl(tokenBytes[2]),
                          ntohl(tokenBytes[3]), ntohl(tokenBytes[4]), ntohl(tokenBytes[5]),
                          ntohl(tokenBytes[6]), ntohl(tokenBytes[7])];
    NSLog(@"deviceToken:%@",hexToken);
    //1.2.7版本开始不需要用户再手动注册devicetoken,SDK会自动注册
    //传入的devicetoken是系统回调didRegisterForRemoteNotificationsWithDeviceToken的入参,切记
    //[UMessage registerDeviceToken:deviceToken];
}
以上方式都可在控制台获取一个长度为64的测试设备的DeviceToken串
注意 用户在系统回调函数- (void)application:(UIApplication )application didRegisterForRemoteNotificationsWithDeviceToken:(NSData )deviceToken里面获取DeviceToken的函数调用pushSDK的api + (void)registerDeviceToken:( NSData * __nullable)deviceToken的时候,传入的token应该是系统函数的入参deviceToken,切记,如果传错会导致收不到通知消息。
生产环境获取Device Token的方法和开发环境一样
生产环境下:
用户需要用抓包工具、代理工具等自行获取device_token或者可以查看NSUserDefaults中的kUMessageUserDefaultKeyForDeviceToken的值。